CLICK HERE FOR THOUSANDS OF FREE BLOGGER TEMPLATES »

Sunday, February 3, 2008

There's a First Time for Everything


Can you believe that I have never eaten polenta? I love Italian food, but I have never tried it! I found this recipe in "Real Simple" magazine and the picture was what sold me. It looked very yummy, so I thought I would give it a try.

I bought the polenta that was already made in a tube. The grocery store had three different kinds, but I opted for plain since I have never had it before. I will definitely be making it again! I thought it was really delicious. My husband used to date an Italian girl, so he is not a newcomer to polenta.

I didn't have any white wine on hand, so I used chicken stock instead. I bet the wine would have tasted better, but the chicken stock worked well. Wine doesn't last long in our house, ahem.
Enjoy this tasty recipe!

Sausage and Peppers with Crispy Polenta
from "Real Simple" magazine February 2008

2 tablespoons olive oil
1 pound Italian sausage
2 medium onions, cut into wedges
salt and pepper
2 small red bell peppers, seeded and sliced 1/4 inch thick
3 cloves garlic, thinly sliced
2/3 cup dry white wine (such as Sauvignon Blanc)
6 sprigs thyme
1 pound store-bought cooked polenta, sliced into thick rounds

1. Heat oven to 400 degrees.

2. Heat 1 tablespoon of the oil in a large ovenproof skillet over medium heat. Add the saugsage and cook, turning once, until it starts to brown, 5 minutes. Add the onions, 1/2 teaspoon salt, 1/2 teaspoon pepper and cook, stirring, for 4 minutes. Add the bell peppers and garlic and cook until they are just soft, about 4 minutes. Stir in the wine and thyme.

3. Transfer the skillet to oven. Roast until the sausage is cooked through, about 15 minutes.

4. Heat the remaining oil in a large nonstick skillet over medium-high heat. Cook the polenta in batches, turning once, until golden brown.

5. Place the polenta on a platter. Spoon the sausage, vegetables, and pan juices over the top. Serve with crusty bread, if desired.

Poor Chicken

I feel slightly bad for the chicken. They aren't particularly smart birds, however, they are mighty tasty. In my case, the chicken makes an excellent pot pie. Still on a roll from last weekend's meat pie, I decided to make a chicken pot pie.

This is a budget conscious recipe. I got the pie crusts on sale for $.99 for two. If you are even on more of a budget, you can make your own crust using butter, flour and ice water. Frozen vegetables, or even fresh are inexpensive, and the canned soup is a pantry staple that most people have. You don't need to use the best cut of chicken. If you have leftovers from a roasted chicken, you could certainly use that. In my house, we have a bag of frozen chicken breasts from Costco. We always have them on hand, and they are pretty cheap.

I didn't follow a recipe for this pie. If you know my cooking style, that is a pretty big surprise! I am not the type of person that can just "whip something up". The measurements below are estimates. Unlike most of the women in my family who can make a gourmet meal out of baking soda, a banana and leftover ground beef. Seriously, it's an art and I don't have the gift.

This was a really really good pie! My husband was surprised that it was done from scratch. It seriously tastes like one of the premium frozen pot pies. Enjoy, and try not to think about the poor chicken that was sacrificed to make this delicious dish.

Chicken Pot Pie
by Pachey

Pan grill 2 boneless skinless chicken breasts (or the equivalent of about 2 cups of chicken) using any type of spices that you prefer. I used thyme, onion powder, salt and pepper.

Mix one can of cream of chicken soup (or cream of celery, mushroom, whatever you have on hand) with about 1/4 to 1/2 cup milk. Once combined, add seasonings. I again used thyme, onion powder, salt and pepper.

Cube the chicken into bite sized pieces. Combine with vegetables (about 3 cups of mixed vegetables). I used stew vegetables, which are more hearty and are a mix of carrots, celery, potatoes and onions. Mix with the creamed soup mixture until combined.

Roll out the bottom crust and place in a pie pan. Pour the chicken/veggie/soup mixture into the pan. Cover with the top crust.

Bake for 25-30 minutes at 350 degrees.

Saturday, February 2, 2008

Not for the Faint of Heart

I grew up with this cake. I love this cake like it was my own child. Every birthday, I had my choice of what kind of cake I wanted, and I always chose this. My mom would put food coloring in the frosting to make it special (ahhh, nostalgia) and we would eat.

According to my mother, and Bill Cosby, this is an appopriate breakfast food. It's got eggs, milk and flour, therefore, it must be suitable for breakfast. I am not going to lie; I will be enjoying a slice tomorrow morning, tee hee.

This is a very dense, dark chocolate cake. If you don't have sour milk on hand, which most people probably don't, you can make sour milk by adding a teaspoon of vinegar. The sour milk gives the cake an extra special flavor. I didn't have any shortening on hand, so I substituted with butter. Watch the cooking time, because the use of butter seemed to speed up the baking. The frosting may be the best part. Real butter, powdered sugar and vanilla. There isn't anything like homeade frosting. None of the store made, fake, Crisco frosting. Ew.
Here is a picture before the cake is frosted. See what I mean about dense? This cake is not for the chocolate faint of heart, or chocolate newbie.


You all have to feel very special, because this is a family recipe. I honestly don't know how old it is, or where it originated from, but here you go. Printed with permission from my mom.


Family Chocolate Cake
1 egg
1 cup sugar
1/2 cup cocoa
1/2 cup shortening (or butter, softened)
1 teaspoon baking soda
1 1/2 cups flour
1 teaspoon vanilla
1/2 teaspoon salt
1/2 cup sour milk
1/2 cup boiling water

1. Put ingredients in order given. Beat together. Put in ungreased square 8-inch pan. Bake at 350 degrees for 30 to 40 minutes. Frost with the buttercream frosting below.

Buttercream Frosting

1 pound confectioners (powdered) sugar
5 tablespoons butter, softened
dash salt
1 teaspoon vanilla
milk (amount depends on consistency)

1. Blend in mixer and add milk slowly to desired consistency. Frost cooled cake.

Sunday, January 27, 2008

Meat Pie

These are usually two words that I don't like to hear together. Mincemeat anyone? Blech. I found this recipe on Allrecipes.com which never seems to disappoint. This dish is a spin off of steak and kidney pie that is popular in Great Britain. I choose to omit the kidneys for obvious reasons. Filtering organs don't belong on my dinner plate.

While this was simmering, the house smelled amazing! It was a savory, beefy, mushroom scent which made my mouth water. Notice all the ingredients are 1 of something. I suppose that would make it pretty easy to remember. I actually added a little more Worcestershire sauce, because I think it adds such a great flavor to cooking.


The recipe doesn't specify what size casserole dish, but with the size of the puff pastry, a 9x9 inch works just fine.
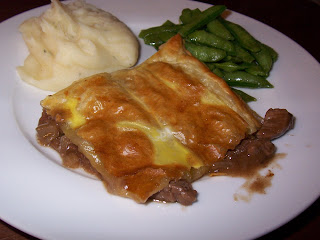
Serve this with mashed potatoes and a green vegetable and you have got yourself a tasty meal.

Now, I have a leftover puff pastry in my freezer. Anybody got any suggestions on what to do with it? Enjoy the Scottish themed dish below!


1 tablespoon vegetable oil
1 pound cubed beef stew meat
1 large onion, chopped
1 package (1 ounce) dry mushroom gravy mix
1 cup water
1 teaspoon Worcestershire sauce
1 pinch salt and pepper to taste
1 sheet frozen puff pastry, thawed
1 egg
1 tablespoon water

1. Heat the oil in a large skillet over medium-high heat. Add beef stew meat, and cook until browned on the outside. Add the onion; cook and stir until tender, about 5 minutes. Stir in the mushroom gravy mix and 1 cup water. Season with the Worcestershire sauce, salt and pepper. Turn heat to low, and simmer for 20 to 30 minutes.

2. Preheat the oven to 400 degrees. Transfer the beef mixture to a casserole dish. Roll out the puff pastry to cover the top of the casserole dish. Press edges onto the rim of the dish to seal. Whisk together the egg and 1 tablespoon of water in a small cup using a fork. Brush over the top of the pastry.

3. Bake for 20 minutes in the preheated oven, until the pastry is puffed and golden brown.

Sunday, January 20, 2008

Yet Another Crockpot Recipe

I am not sure why I have this sudden fascination with using my crockpot. However, it is winter, the weather is dismal and I like to smell dinner cooking all day. The recipe below was given to me by my mother (thanks Mom!) and it was a favorite in her household. I had never tried it before this evening, but I am glad I did.

Now, don't laugh, but I can't make mashed potatoes. Somehow, every time I make them, they manage to come out grainy, watery, and flavorless. Don't laugh. I know it's one of the simplest things on earth to make, but I just can't do it. This time, I didn't overcook the potatoes, I used my new KitchenAid mixer to make them fluffy, I added butter and milk and they turned out good! Until we went to eat them. Sigh. They were still a little more solid than I would prefer, but they were okay.

For the Barbeque Beef, you can use any type of roast. I would steer clear of pot roast, but a brisket, or a bottom round or even a top round would be excellent. The sauce isn't thick like barbeque sauce, and it made a delicious gravy to the meat as well as the potatoes.

This is definitely a recipe I will be making again! Even my husband, who had visions of shredded beef overloaded with sauce enjoyed it. I don't fix beef dishes very often, but I am very glad I did this time.
Enjoy!

Barbeque Beef
from: My Mom

2-2.5 pound beef brisket or roast
1 cup hickory flavored barbeque sauce

1. Place the beef in a slow cooker. Cover with 1 cup of the barbeque sauce.
2. Cook on high for 4-5 hours.
3. Cover with the remaining barbeque sauce and cook an additional 15-30 minutes.

Saturday, January 19, 2008

Soup for a Cold Night

I got this recipe years ago from a friend, and she will admit that I make it more often that she does! I can't help it. It's a favorite in our house. I know, I say that about a lot of my recipes, but it really is. It takes pantry staples and a pound of ground beef, but you end up with a huge batch of soup.


It can only be described as a cross between a chili and a soup. It honestly doesn't take like tacos though, so I am not sure the name is very fair. It is prepared very quickly (within about 30 minutes) and it's just as good reheated.


There are a lot of variations on this. You can change out the type of beans, or you can add a little green pepper, more onion, play with the spices. The choices are endless! It's a pretty healthy meal, with the exception of the cheese quesadillas. Those aren't so healthy unless you use a lower fat cheese (what's the point?). However, we indulge about every four months, so a quesadilla certainly won't kill us. Although the oodles of Tabasco I add may!

Taco Soup

Brown and drain: 1 pound lean ground beed and 1/2 cup onion.
Add:
3 cups water
2 16-ounce cans Mexican style stewed tomatoes
2 16-ounce cans kidney beans, undrained
2 8-ounce cans tomato sauce
1 envelope taco seasoning
chili powder and/or Tabasco to taste

1. Bring all ingredients to a boil and simmer for 15 minutes.


Cheese Quesadillas
from: Pachey

flour tortillas
Mexican blend cheese
green Taco sauce (such as La Victoria)

1. Spread 1/2 cup of cheese on a tortilla. Add green Taco sauce to taste (about 2 tablespoons).

2. Top with another tortilla

3. Over medium-high heat in a frying pan, cook the quesadilla. Don't add any oil to the pan. It's just to "toast" the tortillas.

4. Allow to slightly brown. Remove from heat and cut into wedges.

Sunday, January 6, 2008

A Thing of Beauty!

If you happen to be one of the two (okay, maybe three) readers of my blog, you will remember my post about the ancient mixer. Well, the ancient mixer has gone by the way of the Dodo. For Christmas, my husband bought me the mother of all mixers.


Ta dah! Introducing......my new KitchenAid Artisan stand mixer!


I just had to use it, so tonight, I made cookies. I didn't care what I made, I just wanted to use my brand new mixer! I am most familiar with my mom's mixer, and her's is a good 15 years old. So, I was suprised to see that things have changed a bit on them. My bowl is a little more heavy duty, especially the handle. And, the beater goes all the way down to the bottom of the bowl, and it looks like it's going to scrape, but it doesn't!

I love my new mixer. It fits so well into my little red kitchen. Now, we just need to move into a bigger house so I can get all the other red KitchenAid appliances!

I made these cookies:


They were very easy, and tasty! I have a feeling they are going to stay moist for a very long time due to the cake mix. I use the Cake Mix Doctor cookbooks often, especially when I want something easy and semi-homeade (not a Sandra Lee plug!). Usually, you dump all the ingredients and mix. With these cookies, it was the same. You dump, mix and dump again.

I hope you enjoy these moist, chocolatey cookies. Oh yeah, I made dinner tonight too, but it wasn't nearly as exciting as using my new mixer.

White Chocolate Chewies
from The Cake Mix Doctor

solid vegetable shortening for greasing the pans (I used cooking spray)
1 package (18.25 oz) plain devil's food cake mix
1/3 cup water
4 tablespoons butter, melted
1 large egg
1 teaspon vanilla extract
1 cup white chocolate chips

1. Place a rack in the center of the oven and preheat the oven to 350 degrees. Lightly grease cookie sheets with vegetable shortening. Set the pans aside.
2. Place the cake mix, water, melted butter, egg, and vanilla in a large mixing bowl. Blend with an electric mixer on low speek for 1 minute. Stop the machine and scrape down the sides of the bowl with a rubber spatula. Increase the speed to medium and beat for 1 minute more. The cookie dough will be thick. Fold in the chips until well distributed.

3. Drop heaping teaspoons of the dough 2 inches apart on the cookie sheets. Place the pans in the oven. If your oven cannot accommodate both pans on the center rack, place one pan on the top rack and one on the center rack and rotate them halfway through the baking time.