CLICK HERE FOR THOUSANDS OF FREE BLOGGER TEMPLATES »

Saturday, May 23, 2009

That's a Pizza Pie!

Sorry for the lack of blogging lately. I chalk it up to the fact that I was on vacation for over a week. I enjoyed lots of culinary treats from such far away lands as Maine, New Hampshire, Massachusetts and Quebec. Quebec was awesome by the way! That could take up a whole separate blog entry.


Amazingly, I didn't gain a single pound on vacation. As a matter of fact, I might have actually lost one due to all the walking and mucking around on the farm (that is another blog entry too). However, I wanted to get back to healthy eating, and I was actually missing being in the kitchen. So armed with my Cooking Light cookbook, I sat down and made my grocery list.

Tonight, after working all day in the yard and getting a sunburn (oops), I wanted something quick and easy for dinner. Oh.My.Goodness! This recipe is awesome! A friend of mine, Katie, actually recommended it to me several weeks ago. I am so glad I made it.

This was the perfect meal to end a hard day in the yard. It was portable, tasty, filling, and it had the right amount of carbs and protein. Nothing says a Saturday night like a pizza, especially one that you don't have to feel guilty eating.

I can't believe this is light. It was so good! While not a typical calzone (typical calzones have ricotta don't they?), it was still delicious. It had just the right amount of cheese, chicken and sauce. The only thing that was missing was fresh basil. The recipe called for it, but I didn't have any on hand. I was going to use the fresh basil from my garden, but the slugs nixed that idea for me. Note to self: Put slug bait down tonight. I used the dried stuff and it was still good.

Here are the cute little calzones all ready to be sealed and baked.

Enjoy this easy, portable dinner. Have a salad with it and you will be all set. I type this as my husband is eating his calzone one-handed while playing his video game. See? I told you it was portable.

The finished product.


Chicken and Basil Calzones
from: Cooking Light Annual Recipes 2009

cooking spray
2 garlic cloves, minced
1 pound ground chicken breast
3/4 cup prepared pizza sauce
1/4 teaspoon crushed red pepper
1/4 cup chopped fresh basil
1 can (13.8 oz) refrigerated pizza crust dough
1/2 cup (2 oz) shredded part-skim mozzarella cheese

1. Preheat oven to 425 degrees.

2. Heat a large nonstick skillet over medium-high heat. Coat pan with cooking spray. Add garlic and chicken to pan; saute 5 minutes or until chicken is no longer pink, stirring to crumble. Stir in pizza sauce and pepper. Reduce heat, and simmer 5 minutes, stirring occasionally. Remove from heat; stir in basil. Let stand 10 minutes.

3. Unroll dough onto a baking sheet coated with cooking spray; cut dough into quarters. Pat each portion into an 8x6-inch rectangle. Divide chicken mixture evenly among rectangles; top each serving with 2 tablespoons cheese. Working with one rectangle at a time, fold dough in half over filling, pinching edges to seal. Repeat procedure with remaining rectangles. Bake for 12 minutes or until golden.

Sunday, May 3, 2009

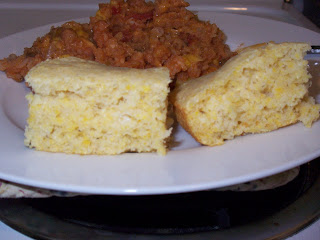
Cornbread!

The title says it all. It doesn't need to say anymore because this cornbread was out of this world! Someone recommended it to me a few weeks ago (someone off the Nest, TYVM) and I am so glad I tried it. You will NOT be disappointed, I promise you. Plus, it makes tons, so you will have plenty left over to eat for dinner another night.

I splurge and buy really good quality cornmeal. I personally like Bob's Red Mill. I am not sure if it's widely available nationwide, but if you are on the West Coast, you can buy it at most grocery stores. I suggest investing in something other than a store brand cornmeal. I like mine stone ground and organic. I might be fooling myself, but I really think it tastes better.

I love love love how moist this cornbread is. If you can't stand overly sweet or underly sweet cornbread, this is the one for you! It's not too sweet and not too bland.

As always, it's easy to put together, which is a nice treat. I seem to be looking for more easy recipes as school and work get busier. Easy + Tasty = Happy Pachey

I had two pieces along side my Mexican Beans and Rice. They were the perfect pairing. You could have this cornbread with chili, soup, or any other dish that strikes your fancy. Shoot, it's healthy enough to eat for breakfast if you really wanted to.

Homesteader Cornbread

1 1/2 cups cornmeal
2 1/2 cups milk
2 cups all-purpose flour
1 tablespoon baking powder
1 teaspoon salt
2/3 cup white sugar
2 eggs
1/2 cup vegetable oil

Preheat oven to 400 degrees F (200 degrees C). In a small bowl, combine cornmeal and milk; let stand for 5 minutes. Grease a 9x13 inch baking pan.

In a large bowl, whisk together flour, baking powder, salt and sugar. Mix in the cornmeal mixture, eggs and oil until smooth. Pour batter into prepared pan.

Bake in preheated oven for 30 to 35 minutes, or until a knife inserted into the center of the cornbread comes out clean.

Saturday, May 2, 2009

Crockpot, Day Two

From the Diary of my Crockpot

Day Two: Again, I sit on this kitchen counter being used. Doesn't this lady realize that I need a break? I mean, sheesh, I just got washed and dried (spa day) and she's using me again! At least she's cooking something different. I am hot, tired, and really need a nap. Sigh......when's dinner?

I'll admit it. I just cooked two crockpot meals from the same cookbook two days in a row. What can I say? When I find something I like (my crockpot and my cookbook), I go with it!

This was very very good, and extremely filling! I was surprised after dinner how stuffed I was. I especially like the fact that you get a lot of food for few calories. I calculated, and it was 8 Weight Watchers Points for this dinner, including the cheese on top. With the beans, it is filled with protein.

Toasting the rice was an interesting step. I am not sure what this does to the dish, but at any rate, it worked! It certainly looked pretty after it was toasted.


My only critique is that it states to cook this for at least 5 hours. Either my crockpot runs really hot, or most people like their food mushy, but this was done in 4 hours. I could have eaten much sooner, but my cornbread wasn't ready yet.

Before it cooks, it looks generally like a soup. Trust me, afterwards, it doesn't resemble a soup at all. You are left with a yummy casserole dish filled with vitamins (and cheese!). Enjoy!


Happy Cinco De Mayo everyone!

Mexican Rice and Bean Casserole
from: Pillsbury One-Dish Meals Cookbook

1 cup uncooked regular long-grain white rice
2/3 cup frozen whole kernel corn
1/2 cup chopped onion
1/4 teaspoon tumeric
2 garlic cloves, minced
1 can (15 oz) spicy chili beans, undrained
1 can (14 oz) stewed tomatoes, undrained, cut up
1 can (14 oz) fat-free chicken broth
1 can (4.5 oz) chopped green chiles
2 oz (1/2 cup) shredded Cheddar cheese

1. Spray a large skillet with cooking spray. Heat over medium-high heat until hot. Add rice; cook and stir 5 to 7 minutes or until light golden brown.

2. In a slow cooker, combine browned rice and all remaining ingredients except cheese; mix well. Cover; cook on low setting for at least 5 hours.

3. Stir mixture; sprinkle with cheese. Cover; cook until cheese is melted.
Mmmm, cheesy goodness!

Not Always a Success

Singing in my best Frank Sinatra voice:

"But he's got high hopes, he's got high hopes. He's got high apple pie, in the sky hopes".

My cooking isn't always a success (can you believe it?!). Not that tonight's was terrible, it just wasn't any spectacular. I thought for sure that I would love this (garlic + chicken + crockpot), but it was just OKAY. Nothing terribly special. I could have had a tastier, juicier chicken in the oven.


It has been a while since I roasted or cooked an entire bird, so I thought "why not?". Chicken is cheap, cooking in the crockpot is easy. Add two of my favorite elements together and you get crock a' cheap! Haha! Seriously though, this was good, just not great.

I did like the fact that I barely had to cut the chicken when it came out of the crockpot. It literally just fell off the bone. That is why I don't have a picture of it. It disassembled itself before I could grab the camera.

The roasted garlic was mighty tasty. I saved some cloves to spread on bread or crackers for another time.

I believe the total cost for this meal was $4.00. $3.30 for the chicken and $.70 for the onion and clove of garlic. I had some potatoes on hand and my go-to vegetable (spinach), so those cost me nothing.

Would I cook this again? Probably not in the crockpot. In the oven though, yes! You could very easily do this same recipe in a roasting pan with the onion and garlic, but covered in foil. That way, the juices stay in and you get the nice flavor of the roasted garlic.

Twenty-Garlic Chicken Dinner
from: Pillsbury One-Dish Meals Cookbook

1 (3-3.5 lb) whole frying chicken
1 teaspoon salt
1 teaspoon paprika
1/2 teaspoon pepper
1 teaspoon olive oil
1 large onion, sliced
1 medium bulb garlic (about 20 cloves)

1. Remove giblets from chicken; remove as much fat as possible. Rinse and drain chicken. Pat dry inside and out with paper towels.
2. In small bowl, combine salt, paprika, pepper and oil; mix to form paste. Spread evenly over chicken.

3. Place onion slices in slow cooker. Place chicken, breast side up, over onion. Separate garlic into cloves; do not peel cloves. Place garlic cloves in and around chicken.

4. Cover; cook on low setting for at least 7 hours.

5. With slotted spoon, remove chicken, onion and garlic from slow cooker. Cut chicken into pieces and serve.

The skin was very flavorful and the roasted garlic (in the middle of the pile o' chicken) was very good.

Heating Pad

Yes, you read that right, I said heating pad. What does a heating pad have to do with cooking? Well my friends, it's a nifty tool in the kitchen. I saw this on "Good Eats" so I can't take the credit, but if you ever make yeast bread or rolls, it's a perfect technique to use to make the dough rise. Really! I have tried it twice now and it works beautifully.


Since I have been out of the cooking/baking loop for a couple of weeks, I wanted to make a special dinner. I have had this recipe stuck up on the fridge for a while now, so I thought, now's the time! I had all day to prepare dinner, so it was the perfect addition to my lazy Saturday cooking.

This is a light recipe, which is always nice. Easy, which is even better. Tasty, which is the best. The title says they are Bakery Dinner Rolls. Although mine didn't turn out quite as poofy as ones in the bakery, and the egg yolk wash turned them a strange color, they were still tasty.

The only thing I would do differently is to add a little more salt to the recipe next time.

I used my mixer to knead the dough. I slapped on the dough hook and let the mixer do all the work. So, in the recipe, where is says to knead, if you are so inclined, you can let your mixer do the work too!

Now, here's the crucial part. When the recipe says to let the dough rise, place the bowl or pan directly on top of a heating pad set on low heat. Really, it works wonders. It takes all the guessing out of whether or not you have the right temperature. Try it, you will be pleasantly surprised.

I am off to eat dinner and enjoy a warm roll. Pay no attention to the color (man behind the curtain). They were delicious. Cooking Light never steers me wrong.

Before the second rise.


After the second rise with the egg yolk wash. They look a little funny, which is probably why they turned out funny looking too.


Bakery Dinner Rolls
from: Cooking Light November 2008


2 tablespoons sugar
1 package dry yeast (about 2.25 teaspoons)
2/3 cup warm water (100 to 110 degrees)
3 tablespoons butter, melted
7.9 oz. all purpose flour (about 1.75 cups) divided
1/2 teaspoon salt
cooking spray
1 large egg yolk, lightly beaten


1. Dissolve sugar and yeast in 2/3 cup warm water in a small bowl; let stand 5 minutes. Stir in butter.


2. Weigh or lightly spoon flour into dry measuring cups; level with a knife. Combine 6.75 oz (about 1.5 cups) flour and salt in a large bowl, stirring with a whisk. Add yeast mixture to flour mixture; stir until a soft dough forms. Turn dough out onto a lightly floured surface. Knead until smooth and elastic (about 4 minutes); add enough of the remaining flour, 1 tablespoon at a time, to prevent dough from sticking to hands. Place dough in a large bowl coated with cooking spray, turning to coat. Cover and let rise in a warm place (85 degrees), free from drafts, 1 hour or until doubled in size. Press two fingers into the dough. If indentation remains, the dough has risen enough. Punch dough down; cover and let rest for 5 minutes.


3. Divide dough into 12 equal portions, shaping each into a ball. Place 1 dough ball in each of 12 muffin cups coated with cooking spray. Cover and let rise 20 minutes or until doubled in size.


4. Preheat oven to 400 degrees.


5. Gently brush dough with egg yolk. Bake for 13 minutes or until browned. Cool in pan on a wire rack for 2 minutes. Remove rolls from pan. Serve warm or cool completely on wire rack.

Okay, so they look a little bizarre. They tasted good though. That is why you see three missing from this picture, tee hee.

Monday, April 27, 2009

Ahhhhhhhhh

That's the sound of relaxation. I have been bad in my blogging skills, but that is because I have been so incredibly busy. That is exactly why Jason and I needed a weekend away at Sandlake Country Inn. I last posted about this B&B in November of 2007 for our 1st wedding anniversary. It has been far too long since we visited (Sorry Diane and Ron!), so we packed up the car and headed to the beach.

Whenever we head to the Oregon Coast, we always stay at Sandlake. I have lost count, but I believe this was our fifth time spending the weekend there.

Here is why we love it:

1. Great food
2. Warm, inviting rooms
3. Very kind and personable innkeepers
4. Cookies at midnight, or any time of the day really
5. Special extras (robes to wear, cozy slipper socks, homemade bubble baths, etc.)
6. Ron's own roasted coffee
7. Cozy beds

This was the deck off of our bedroom. I spent a lot of time sitting out here watching the birds. It was heaven. To see pictures of the rooms, you can check out their website, or actually, just go there and stay a weekend.

I could go on and on. Seriously. We love this place and have recommended it to several friends. The people that we have sent have NOT been disappointed.

Yes, I take pictures of food. My husband thinks this is hysterical.

What arrives at your door an hour or so before breakfast:
Some of the best coffee we have consumed. Ron roasts it himself. I should have bought some before we left but I forgot. Do you guys ship?

Breakfast Day One:
It all comes bundled in a basket to your door. You get to eat privately (in your pajamas if you choose) in your room.

Here is what was on the menu:

Orange Pineapple Juice
Fresh Fruit with Sweet Cream Sauce
Baked Apple Oatmeal with milk
Sandlake Breakfast Pie
Strawberry Filled Muffins
Breakfast Day Two:
I took a bite of the coffee cake before I snapped this picture (I couldn't resist, it looked so delicious).

Here is what was on the menu:

Orange Strawberry Banana Juice
Strawberries and Cream
Diane's Homemade Granola and milk
Italian Eggs
Blueberry Coffee Cake

Now, it's back to reality and real life. I have to cook again, and not have someone else make it. Can I just order pizza for the rest of my life? Better yet, can I just go move to the coast and order pizza there?

Sunday, April 5, 2009

Regular Size Cupcakes

I think this is my first ever blog entry that posts about cupcakes that aren't gigantic.


I have a learning team meeting for school tomorrow, so I decided to bake. That would get my baking itch satisfied as well as give me the chance to offload some of my goodies. After all, I really don't want a dozen cupcakes in my house. You don't need me to explain why.


This is a recipe that I have posted before, but it warrants a second look. It is my go-to chocolate cake recipe. It is also surprisingly easy, and can be made into a regular cake (8x8 sized pan), or into cupcakes. My mother was not convinced that these would do well in cupcake form, but I proved her wrong. Sorry Mom.


These cupcakes could be easily jazzed up by changing the frosting. Now, don't mess with the buttercream itself. It's just too good to be altered. I am suggesting that you use a different flavored extract. Peppermint for Christmas time, orange for the summer, lemon would be delicious, or how about almond? I am pretty certain that any extract would be good with the chocolate in the cupcakes.


Aren't these guys cute? I left them in their newborn form and decided not to taint them with sprinkles or food coloring. After all, who doesn't love just a plain cupcake? Let the flavor of the cake and the frosting speak.....er taste for itself.

I hope my learning team likes them!


Sour Cream Chocolate Cupcakes
from: Pachey's Family Recipe


1 egg
1 cup sugar
1/2 cup cocoa
1/2 shortening (I used butter)
1 teaspoon baking soda
1.5 cups flour
1 teaspoon vanilla
1/2 teaspoon salt
1/2 cup sour milk (if you don't have sour milk, add a teaspoon of vinegar to the milk)
1/2 cup boiling water


* Put ingredients in order given. Beat. Pour into cupcake pans, filling the pan 2/3 full.
* Bake at 350 degrees for 20 minutes.


Frost with Buttercream Frosting

1 pound confectioners sugar
5 tablespoons butter, softened
dash salt
teaspoon vanilla
milk (depending on consistency)


* Blend ingredients in mixer. Add milk to desired consistency. Frost cooled cupcakes.