CLICK HERE FOR THOUSANDS OF FREE BLOGGER TEMPLATES »

Saturday, November 28, 2009

Is it a Cookie or a Pie?

I will let you decide. This recipe is inspired by a trip to the beach that my husband and I took a few months ago. We went to a restaurant for dinner and while dinner was good, dessert was MUCH better. I had honestly forgotten about this pie until Jason mentioned it a few weeks ago. "You know what you should make? That Toll House Pie from the beach". Oh dear. Once he mentioned it, I couldn't forget about it.


So, I went searching for a good recipe online. I think this one comes pretty close. It wasn't identical to the one at the restaurant, but with a little tweaking, I can get it to work.

I know it sounds weird. The same ingredients that go in the cookies go into a pie. Of course, it isn't exact. For one, you have to beat the eggs until super foamy. You don't do that for the cookies. Trust me on this, it's very good. I know it sounds bizarre to put cookie batter into a crust, but it really isn't cookie batter. It's a little thinner. If you were to add the walnuts (which I didn't), it would probably have been thicker.

Here is what the pie looks like before baking. See? Not as thick as normal cookie batter.


When it bakes up, the top will become very brown, and that is okay. It's what it's supposed to do. Let it keep baking. The last thing you want to end up with is an undercooked center. I prefer a warm slice of pie, so I cut into it about 20 minutes after it came out of the oven and it was perfectly fine. You can always heat it up in the microwave as well.

This was very good! If I need to bring a dessert with me to a potluck anytime soon, I might bring this. It's unexpected and delicious. After all, who doesn't love some Toll House Cookies, errr, I mean pie?


Toll House Pie

2 eggs
1/2 cup flour
1/2 cup sugar
1/2 cup firmly packed light brown sugar
3/4 cup butter, softened
1 cup chopped walnuts
1 cup (6 oz) Nestle Toll House semi-sweet chocolate chips
1 (9 inch) unbaked pie shell
whipped cream or ice cream, optional

Preheat oven to 325 degrees. In a large mixer bowl, beat eggs at high speed until foamy, about three minutes. Beat in flour, sugar, and brown sugar until well blended. Beat in softened butter. Stir in walnuts and chocolate chips. Pour into pie shell.

Bake 55 to 60 minutes or until knife inserted in halfway between the edge and center comes out clean, and top is golden brown. Cool on wire rack. Serve with whipped cream or ice cream.

If using frozen pie shell, use deep dish style; thaw completely. Place on cookie sheet; increase baking time by 10 minutes.


Chili Take a Million

I love chili, and I love looking for new chili recipes. In one particular cookbook (where I found this chili recipe actually), I have made almost every single one. I think there are three or four that I haven't made. One day, I am sure I will.

Chili is one of those meals that is not only easy, but satisfying. It's so nice to be able to put items into a pan or a crockpot and just forget about it until dinner time. Plus, it contains a ton of protein so it's filling. Beans and meat and tomatoes. What could be better than that? Along with a nice corn muffin, it's a hit in my house. Jason and I both love chili. If you don't believe me, check out the prior posts about chili or soups that are almost like chili. See? I told you.

Not only is chili a favorite, but so is the cookbook I found this from. I love my Pillsbury cookbook. I have only made one or two recipes out of it that were a disappointment. Everything else has been delicious. This was another success. There was the perfect amount of meat to bean ratio. I thought it might taste weird with the addition of tomato soup, but not at all! I think it just added to the thickness of the recipe.

This is a relatively inexpensive meal to make because it takes mostly canned goods and less than a pound of meat. However, it feeds an army so it's very economical. Many of these items are ones that a normal family would have on hand in their pantry. Beans, taco seasoning, tomatoes and soup.

Like the recipe suggests, I drained the butter beans for a thicker chili. I also added quite a bit of Tabasco to the mix since we like spicy food. Of course, if you are not a fan of the spice, leave out the Tabasco. Serve this with a green salad and cornbread and you have a complete meal. That is exactly what I did.

Easy as 1, 2, 3. You cook the veggies and meat and throw the remaining items in the crockpot. Simple right? I do love to cook but I also love the ease and laziness of using my crockpot. Now, one day I will actually find a chili recipe that I will stick with. Or maybe not. Maybe I will just keep trying new ones.

Three-Bean Chili
from: Pillsbury One-Dish Meals Cookbook

1/2 pound ground beef or ground turkey
1 cup chopped onion
1/2 cup chopped green bell pepper
1 can (28 oz) whole tomatoes, undrained, cut up
1 can (15 oz) tomato sauce
1 can (10.75 oz) condensed tomato soup
1 package (1.25 oz) taco seasoning
1 can (15 oz) dark red kidney beans, drained
1 can (15 oz) great northern beans, drained
1 can (15 oz) butter beans, undrained *

1. In medium skillet, brown ground beef with onions and bell peppers until beef is thoroughly cooked. Drain.

2. In slow cooker, combine cooked ground beef mixture, tomatoes, tomato sauce, soup, and taco seasoning mix; mix well.

3. Cover; cook on high setting for 30 minutes.

4. Stir in beans. Reduce heat to low setting; cover and cook an additional 4 to 5 hours or until thoroughly heated.

Tip: For a thicker chili, drain butter beans.


Spaghetti With a Twist

Based on my prior posts, I am sure it is obvious just how much I love two things: Pasta and tomatoes. And I know that this little boy growing in me takes after his mom. He loves pasta too. Every time I eat pasta or anything sweet, he goes nuts! He kicks and moves and lets me know that he loves my dinner. That isn't the subject of this post though. I haven't had good luck finding new recipes from Cooking Light these past few issues, however, the month of December was a veritable gold mine! I think I pulled out at least a dozen recipes that I want to make. This is one of them.

I like this recipe for a number of reasons:

1. It was easy to make. Case in point, I made it on a weeknight (which I hardly ever do), and the tag in the magazine said this was a 30 minute recipe.

2. It took pantry staples that I had on hand: Olives, capers, pasta, marinara sauce and spices.

3. It was a different twist on spaghetti. Don't get me wrong, I could eat plain pasta with plain tomato sauce every day of the week. However, it was nice to try something new.

4. Jason liked it! He eats my pasta with a smile even though I know half the time he is a little annoyed. He does not share my love of pasta.

Cooking Light has gained my love back. Not that I ever lost my love for them. I just needed a kick start to find a new recipe. This was very easy and I love the fact that it's light. A serving of a cup of pasta and 3/4 cup of the sauce was a mere 445 calories. That isn't bad! Pair this with a green salad and a glass of milk like I did and you will be full for several hours. I didn't feel a bit guilty eating this.

I don't keep sherry on hand, but I imagine red wine would probably be fine. I just used water since it called for only 1/4 cup. That and the saffron, which is optional anyways, are the two ingredients that I didn't have on hand. I added about double of the red pepper since we like things spicy in our household. The results were a very nice spiced pasta kick.

Try this recipe! It's very very good. I have been eating the leftovers as well. They are just as tasty reheated.

Spanish Spaghetti with Olives
from: Cooking Light December 2009

8 ounces thin spaghetti
1 tablespoon olive oil
2 cups choppen onion
2 teaspoons minced garlic
1 teaspoon dried oregano
1/2 teaspoon celery salt
1/4 teaspoon crushed red pepper
1/4 teaspoon freshly ground black pepper
1/4 teaspoon crushed saffron threads (optional)
8 ounces extra-lean ground beef
1 2/3 cups marinara sauce
1/2 cup sliced pimento stuffed olives
1/4 cup dry sherry
1 tablespoon capers
1/4 cup chopped fresh parsley, divided

1. Cook pasta according to package directions, omitting salt and fat.

2. Heat oil in a large skillet over medium-high heat. Add onion to pan; saute 4 minutes or until tender. Add garlic; saute 1 minute. Stir in oregano, celery salt, red pepper, black pepper and saffron. Crumble beef into pan; cook 5 minutes or until beef is browned, stirring to crumble. Stir in marinara sauce, olives, sherry, capers, and 3 tablespoons parsley. Bring to a boil; reduce heat, and simmer 15 minutes.

3. Add spaghetti to sauce mixture. Cook 2 minutes or until thoroughly heated. Sprinkle with remaining 1 tablespoon parsley.


Chicken French Style

Okay, I want to know if cordon bleu is really French. When I was in Quebec, I don't recall seeing a cordon bleu on any menu. However, I might not have been looking very carefully. Also, answer this for me: If this is a French recipe, why do you use Swiss cheese? Would a French cheese be more appropriate? I do know that my family is French Canadian and chicken cordon bleu happens to be my dad's favorite meal. I have personally never made it but I have eaten the very tasty frozen ones from Costco. Knowing how much I love my crockpot, I thought I would give this recipe a try.

I would like to disclaim right up front: This is a recipe I will never make again. Not because it wasn't tasty. It's because they were a pain to make, and when you eat them, you have to worry about toothpicks unless you were smart and counted how many you put in each chicken breast. Jason and I both really liked this recipe, but again, it was a pain in the arse to make. Or pain in the hoosegow as my French Canadian Memere would say.

You can serve these little rolls on either rice or over egg noodles which is what we did. Also, depending on the size of your chicken breasts, you might only need 3 instead of the 6 it calls for. I was able to get a lot of my aggression out on these poor little chicken breasts. Like the regular, non-crockpot cordon bleu, you have to pound the breasts pretty thin.

The recipe calls for prosciutto and hopefully your's will be more cooperative than mine. In retrospect, I should have used ham. The prosciutto was so darn thin that when I peeled it off the paper, it just fell apart. Pain in the butt take one. I had to cut the cheese down a little bit so that it would fit on the chicken breasts. Pain in the butt take two. Next, the chicken had to be rolled up and secured with toothpicks. Pain in the butt take three, four and five. Seriously, PAIN IN THE BUTT.

I didn't want to use white wine, probably because I am lazy and that would have required me to buy some, so instead, I used some chicken broth that I had in the fridge. I feel the substitution was completely fine and I doubt it altered the taste.

I hope you are more successful than I am when making these. Again, they were good, but did I mention a slight pain?

Chicken Cordon Bleu Rolls
from: The New Creative CrockPot Cookbook

6 chicken breasts, pounded to 1/4 inch thickness
6 slices prosciutto
6 slices Swiss cheese
salt and pepper to taste
1/2 can cream of mushroom soup
1/4 cup milk
1/4 cup white wine

On each chicken breast, place on piece of prosciutto and cheese. Roll up each chicken breast and secure with a toothpick. Season each roll with salt and pepper. Place in the crockpot. In a small bowl, whisk together the soup, milk and white wine. Pour this mixture over the chicken breast rolls. Cover; cook on low 4 to 6 hours (or on high 3 to 4 hours).


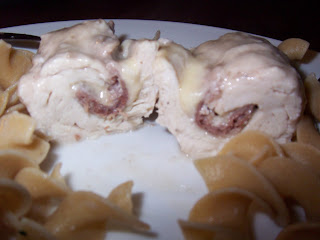
This is what the rolls look like when you cut into them. Yummy!

Even More Pumpkin!

Sorry about my lack of blogging lately. In between doubling up on classes, getting ready for the bean, not cooking a whole lot and the holidays, I have been a slacker. So, I will spend some time today updating.

I made this recipe several weeks ago. I had some leftover canned pumpkin in my fridge and I didn't want it to go to waste. After all, I can never pass up an opportunity to bake. I went in search of a recipe that was both healthy (because I am trying not to gain too much pregnancy weight) and tasty, well because let's face it, taste is the most important aspect.

I believe this is the first time I have used a recipe from cooks.com and I certainly wasn't disappointed. I found a lowfat muffin recipe (140 calories per muffin and only 4.6 grams of fat) that was really tasty. I only altered one thing and that was the sugar. I used half sugar and half Splenda. If you use all the sugar that the recipe calls for, it only adds a few calories per muffin. Not enough to worry about.

This was very easy to throw together. So much so that on a night before class, I whipped these up and brought in a batch for my classmates. It took less than an hour to make and bake and package them up.

I put the label for this recipe as a dessert and breakfast because I feel that pumpkin and raisins are appropriate all times of the day. So if you are looking for a quick breakfast, grab one of these muffins and a cup of coffee and you are all set!

These muffins don't have an overpowering taste of pumpkin. I love pumpkin, so it doesn't bother me how much is in a recipe, however, some people don't care for pumpkin. These muffins have a very nice pumpkin accent. It is one of the main ingredients, but even if you don't care for pumpkin, I think you would like these. They result in a very moist, muffin. I suggest eating them while they are still warm. They were the most tasty that way!

Be careful not to overmix the batter. Follow the directions and only mix until the flour is moistened. I really think the muffins were moist because of this. The more you mix, the tougher the muffins will be. Also, don't be afraid to add more spice than the recipe calls for. I always add a little extra cinnamon and nutmeg to things. It gives more depth (doesn't that sound fancy?) to the recipe in my opinion.

Pumpkin Muffins
from: www.cooks.com

1 1/2 cup flour
1/2 cup sugar (I used half Splenda and half sugar)
2 teaspoons baking powder
1/2 teaspoon salt
1/2 teaspoon cinnamon
1/2 teaspoon nutmeg
1/2 cup milk
1/2 cup canned pumpkin
1/4 cup butter, melted
1 egg
1/2 cup raisins

Heat oven to 400 degrees. Grease bottoms of 12 medium muffin cups. Mix all ingredients just until flour is moistened. Batter should be lumpy. Fill muffin cups 2/3 full. Sprinkle 1/4 teaspoon sugar over batter in each cup. Bake 18 to 20 minutes. Immediately remove from pan.

Aren't these beautiful when you cut into them?


Sunday, October 25, 2009

More Pumpkin

I told you that I have wanting pumpkin lately! It's fall after all and nothing says fall like pumpkin and spice. So, here goes. This recipe is one that I pulled out of Cooking Light this month. I am less likely to feel guilty about baking if the recipe is one that is from Cooking Light. Maybe it's all in my head.

The picture is what drew me to this. A delicious looking cake with a nice cream cheese frosting. While cream cheese frosting isn't my favorite, I can make special exceptions. Plus, the best part? It's light!

My picture didn't turn out quite as pretty as the one in the magazine, but that's okay. Case in point:

My cake is flatter then the picture. I do have to say though, I cut this piece from the flattest part of the cake. The rest is much more springy and less condensed. Operator error I am sure.


The end results were very good! And anything when I can use my Kitchenaid is a good thing. Confession: I sometimes look for recipes that calls for a mixer just so I can use mine.

This is a moist cake made so by the canned pumpkin. It really is the star of the cake. After all, it wouldn't be a pumpkin cake without the pumpkin. The brown sugar gave it richness that white sugar couldn't, and the fact that it doesn't have much fat (butter) in it, is what makes it light.

The frosting does have a lot of powdered sugar and butter and cream cheese in it, but you aren't eating that much icing. The majority of the serving size is cake. Plus, the pieces are cut small which also helps in keeping this cake well under 200 calories a piece.

Frosted Pumpkin Cake
from: Cooking Light Magazine November 2009

Cake:
10.1 ounces flour (about 2 1/4 cups)
2 1/2 teaspoons baking powder
2 teaspoons ground cinnamon
1/4 teaspoon salt
1 cup packed brown sugar
1/4 cup butter, softened
1 teaspoon vanilla extract
2 large eggs
1 can (15 ounces) pumpkin puree
cooking spray

Frosting:
2 tablespoons butter, softened
1/2 teaspoon vanilla extract
1 package (8 ounces) 1/3-less fat cream cheese
2 cups sifted powdered sugar

1. Preheat oven to 350 degrees.

2. To prepare cake, weigh or lightly spoon flour into dry measuring cups; level with a knife. Combine flour, baking powder, cinnamon, and salt in a small bowl, stirring with a whisk.

3. Combine brown sugar, 1/4 cup butter, and 1 teaspoon vanilla in a large bowl; beat with a mixer at medium speed until well combined. Add eggs, 1 at a time, to sugar mixture; beat well after each addition. Add pumpkin; mix well. Fold in flour mixture. Spread batter into a 13x9 inch baking pan coated with cooking spray. Bake for 25 minutes or until a wooden toothpick inserted into the center comes out clean. Cool completely in pan on a wire rack.

4. To prepare the frosting, combine 2 tablespoons butter, 1/2 teaspoon vanilla, and cream cheese in a medium bowl; beat with a mixer at medium speed until combined. Gradually add the powdered sugar, beating until well combined. Spread frosting evenly over top of cake.

Pumpkin For Breakfast

Remember when I said that fall is in the air? You know what that means? It's time for pumpkin! Starbucks has had their Pumpkin Spice Latte out for a few weeks now and I will admit that I have indulged. Quite a few times actually.

I made two pumpkin recipes this weekend. One was enjoyed this morning at breakfast. It's a recreation of Starbucks' latte. How did it turn out? It was okay. Of course, it wasn't nearly as good as the real thing, but it saved me money and a trip out of the house at 8:00 in the morning.

I prepared this recipe last night and chilled it in my baby crockpot in the fridge over night. My lovely husband then took it out of the fridge and started it at 6:00 this morning (he works swing shift and usually comes to bed around that time). So, when I woke up, I had my delicious coffee beverage waiting for me.

I would suggest using much stronger coffee than I did. While it was good, I prefer my coffee to actually taste a little like coffee. So next time I make this, it will be with the stronger stuff. Also, I imagine whipped cream would be delicious on this. I wouldn't know. I am trying not to gain too much weight during this pregnancy, so I omitted the whip. I am pretty sad about that because I think the whipped cream really adds to the flavor.

Overall, this was easy and yummy. I have some leftover for my breakfast tomorrow which makes me doubly happy.

Crockpot Pumpkin Spice Latte
from: http://crockpot365.blogspot.com/2008/10/crockpot-pumpkin-spice-latte-recipe.html

2 cups milk (I used 1%)
2 tablespoons canned pumpkin
2 tablespoons white sugar (I used Splenda instead)
2 tablespoons (yes tablespoons) vanilla extract
1/2 teaspoon pumpkin pie spice
1/2 cup brewed espresso or 3/4 cup strong brewed coffee

This will make enough for two people to have a big mug with a bit leftover. If you are having friends over, adjust the recipe accordingly. I used my baby crockpot (for dips and small things) for this, but you can double and use a bigger crockpot.

Add the coffee/espresso and milk to the crockpot. Whisk in the pumpkin, spices, sugar and vanilla.

Cover and cook on high for 2 hours if everything is cold. Whisk again.

See? Mine is a little pale. Use STRONG coffee!