CLICK HERE FOR THOUSANDS OF FREE BLOGGER TEMPLATES »

Sunday, March 15, 2009

A Forgotten Favorite

I say this is forgotten because it's been sitting in my picture folder untouched for over a year. I have been cooking recipes that I have blogged about before, so rather than do duplicates, I have been diving into my archive folder. I am not quite sure why I didn't post it when I first made it. I probably got too busy with school or work. At any rate, don't let its lateness trick you. And don't let the really terrible picture fool you either. This recipe is very good.


The only complaint I have about this one (and it's minor) is that the cooking time in the cookbook is off. That could be the fault of my crockpot also. So, I really shouldn't even consider it a complaint. The cooking time says 6-8 hours on low or 3-4 on high. However, when I made it, it was done within 3 hours on low. So, you might want to watch your crockpot carefully if you make this one.

When I made this, I decided to do a whole theme to our eats. The Taco Bake along with salsa, sour cream and tortillas to wrap everything up in. I will admit now that the tortillas didn't get used. With the macaroni, you don't need an extra starch. The Taco Bake is yummy enough on its own.

This recipe can easily be altered to make it lighter. For example, use ground turkey or chicken in place of the ground beef. Or, if you really want to use the ground beef, use 95% fat free. Also, cut back on the amount of cheese that you use. Especially since it's just a topper to the Taco Bake and doesn't get mixed in.

I haven't made very many recipes out of this cookbook, but as I glance back through it, there are lots of them that sound good. I love using my slow cooker and am always up for trying new items. So, here's to more recipes using the crockpot! As a matter of fact, it's Salsa Chicken night in my house. Yummmm, I can smell it cooking.

Taco Bake
from: 365 Favorite Brand Name Slow Cooker Recipes

1 pound ground beef
1 onion, chopped
1/4 water
1 package (1.25 oz) taco seasoning
1 can (15 oz) tomato sauce
1 packgae (8 oz) shell macaroni
1 can (4 oz) mild chopped green chilies
2 cups mild shredded Cheddar cheese

1. In a large skillet, brown ground beef and onion; drain fat. Add water, taco seasoning and tomato sauce; mix. Simmer 20 minutes.

2. Transfer to the slow cooker. Stir in macaroni and chopped chilies. Cover and cook on Low 6-8 hours or High 3-4 hours. In last 30 minutes of cooking, top with shredded cheese.


It's All About Balance

Yesterday, I blogged about a cake that I made several months ago but couldn't eat currently because of my quest to lose weight. Well, I figure now's a good time to post a cake that I can eat.

Tada! Introducing.......A Lighter Chocolate Pound Cake! This is another Cake Doctor recipe, and honest to goodness, you cannot tell it's light. This cake is so incredibly moist and rich! As you can see by the pictures, it's very dark. The flash on my camera can't handle its awesomeness.


Don't be fooled by the ingredients. It seems very simple, yet, it's perfect. Serve it alone, or maybe with a touch of powdered sugar dusting, or like we did: with fresh whipped cream. It is a cake that stands alone on taste, so truly, you don't need a topper.

I have both of the Cake Doctor cookbooks and I haven't made an item in either one that doesn't taste great. I believe the same author makes a cupcake cookbook as well as a cookbook using boxed meals. It's probably a good thing that I don't have either of those. I would be holed up in my kitchen for days.

I have to admit that I haven't counted the WW points for this, but I am sure it's fairly reasonable for a serving. That being said, maybe I shouldn't. I might just be tempted to make it again. Which would be bad. Along with peanut butter, anything chocolate is a "danger" food. You could even make this cake lightly by substituting the oil for unsweetened applesauce, and using egg substitute rather than the whole eggs. I am sure it would still be delicious.

I can at least stare at the pictures and allow you to make it by proxy for me.

A Lighter Chocolate Pound Cake
from: Chocolate from the Cake Mix Doctor
1 package (18.25 oz) plain devil's food cake mix
1 package (3.9 oz) chocolate instant pudding mix
1 cup vanilla low-fat yogurt
1/2 cup water
1/2 cup vegetable oil
4 large eggs
1 teaspoon pure vanilla extract

1. Place a rack in the center of the oven and preheat to 325 degrees. Lightly mist a 12-cup Bundt pan with vegetable oil spray, then dust with flour. Shake out the excess flour. Set the pan aside.

2. Place the cake mix, pudding, yogurt, water, oil, eggs, and vanilla in a large mixing bowl. Blend with an electric mixer on low speed for 1 minute. Stop the machine and scrape down the sides of the bowl with a rubber spatula. Increase the mixer speed to medium and beat 2 minutes more, scraping down the sides again if needed. The batter should look thick and well combined. Pour the batter into the prepared pan, smoothing it out with the rubber spatula. Place the pan in the oven.

3. Bake the cake until it springs back when lightly pressed with your finger, 48 to 52 minutes. Remove the pan from the oven and place it on a wire rack to cool for 20 minutes. Run a long, sharp knife around the edge of the cake and invert it onto a rack to cool completely, 20 minutes more.

Saturday, March 14, 2009

Because I Can't Have It

To torture myself, I have decided to drool helplessly over this delicious chocolate cake. No, I didn't give up cake for Lent. I didn't give up anything for Lent actually (bad Pachey). Since I am trying to lose weight.....I am down 17 pounds so far........I am trying to eat healthy. This cake does not constitute healthy. In fact, it is making my arteries clog up just thinking about it.


Food that tastes good is bad for you. At least generally that's the case. Food that tastes good can also be healthy (see the last few entries for proof). This is not one of the healthy recipes. It contains the following fatty (aka TASTY) ingredients:

* devil's food cake
* buttermilk
* oil
* peanut butter
* butter
* confectioner's sugar

So you be asking yourself "If she can't eat it, why in the world is she making it?". Maybe you aren't asking yourself that, but I will confess. I didn't make it. I made this cake several months ago. I just haven't blogged about it until now. A girl can dream right?

I can't even keep peanut butter in the house. It's one of my "danger" foods. Meaning, I will eat it. All of it. So, until I can be safe around peanut butter, I will just drool at this cake.

Notice I don't have any after pictures of the cake assembled. See above about peanut butter being a danger food. I probably was too busy scarfing down a giant piece of cake and a glass of milk that I didn't have time to take a picture.

Needless to say, this cake is delicious. For all you food purists that turn your noses up at using a cake mix, I say: Tough. Have you ever tried a recipe from the Cake Doctor? Don't knock it til you try it. Her cakes are amazing and you can't tell they came from a mix.

This sheet cake would make an awesome addition to a potluck, or if you want to bribe someone, this cake is the way to do it. It's portable since you don't remove it from the pan. It's almost like a Reese's Peanut Butter Cup in cake form. Now if it were only Weight Watchers friendly. It actually is, but with a little alteration. Yes, I have calculated it.

Chocolate Sheet Cake with Peanut Butter Frosting
from: The Cake Mix Doctor

1 package (18.25 oz) plain devil's food cake mix
2 tablespoons unsweetened cocoa powder
1 1/3 cups buttermilk
1/2 cup vegetable oil, or canola oil
3 large eggs
1 teaspoon pure vanilla extract

1. Place a rack in the center of the oven and preheat to 350 degrees. Lightly mist a 13x9 inch baking pan with vegetable oil spray. Set the pan aside.

2. Place the cake mix, cocoa powder, buttermilk, oil, eggs, and vanilla in a large mixing bowl. Blend with an electric mixer on low speed for 1 minute. Stop the machine and scrape down the sides of the bowl with a rubber spatula. Increase the mixer speed to medium and beat 2 minutes more, scraping down the sides again if needed. The batter should look thick and combined. Pour the batter into the prepared pan, smoothing it out with the spatula. Place the pan in the oven.

3. Bake until the cake springs back when lightly pressed with your finger and just starts to pull away from the sides of the pan, 40 to 45 minutes. Remove the pan from the oven and place it on a wire rack to cool for 30 minutes.

Time for a new 13x9 inch pan. Errr, maybe it's just well seasoned.

Peanut Butter Frosting

1 cup creamy peanut butter
8 tablespoons (1 stick) butter, at room temperature
2 cups confectioners' sugar, sifted
3 to 4 tablespoons milk
2 teaspoons pure vanilla extract

1. Place the peanut butter and butter in a large mixing bowl. Blend with an electric mixer on low speed until fluffy, 30 seconds. Stop the machine. Add the sugar, 3 tablespoons milk, and the vanilla. Blend with the mixer on low speed until the sugar is well combined, 1 minute. Increase the speed to medium and beat until the frosting lightens and is fluffy, 1 minute more. Blend in up to 1 tablespoon milk is the frosting seems too stiff.

2. Use at once to frost the cake.

I really could eat this by the spoonful.

Sunday, March 8, 2009

Nostalgic Pasta

I am not sure why, but this recipe makes me feel about 20 years younger. Maybe it's the spiral pasta, the fact that it has pepperoni in it, or maybe it's just something that reminds me of what a child would like to eat.


I had a cooking dilemma today. I wanted to make lasagna, but wasn't sure if I wanted to put forth that much effort cooking. I thought pizza sounded good, but I wanted to cook and homemade pizza just doesn't taste as good to me. So, to compromise with my split personality and indecisiveness, I found this recipe. Tada! Pizza Pasta! Best of both worlds. Pasta and some of the same ingredients of lasagna, and some of the same ingredients as pizza.

God bless the Crock Pot cookbook. I can always find something yummy in there. I have several crock pot recipe books, and The New Creative Crock Pot Cookbook is wonderful. I have about 15 recipes dog-eared ready to use whenever I need to make something new. This was one of the dog-eared recipes.

I had to buy the ingredients at the grocery store because I didn't have many of them on-hand. That's okay. Honestly, I thought I was going to spend a lot more money. I bought everything from scratch with the exception of the tomatoes and the onion. My $13 total even included a package of brown and serve breadsticks! Although not the cheapest meal I have ever made, I thought $13 was fairly reasonable, also considering the amount of food this makes.

I doctored the recipe slightly from the ingredients. I will post the original recipe and call out my additions/substitutions.

Here is everything ready to go in the crockpot.


This was delicious! I am so glad I added the pizza sauce even though the recipe didn't call for it. It added some moisture to the pasta, otherwise, it would have been very dry. Also, don't omit the Parmesan. It gives the pasta a special touch also. Sometimes, it's the simple things that make dishes really tasty.

Enjoy!

Pizza Pasta
from: The New Creative Crock Pot Cookbook

4 cups corkscrew pasta, cook al dente and drained
15 slices salami, sliced into thin strips (I prefer pepperoni, so that is what I used. I also used more than 15 pieces. I think I used probably 20-25 cut into chunks)
4 fresh tomatoes, chopped (I seeded mine so they wouldn't be too watery)
1 medium onion, chopped
1 green pepper, seeded and chopped
1 can (4 oz) sliced black olives, drained
2 cloves garlic, minced
1 teaspoon salt (I didn't use any because of the salt from the pepperoni and the pizza sauce)
1 teaspoon dried oregano
1/2 teaspoon dried rosemary
1 cup mozzarella cheese, grated (I used more. Probably about 1.5 cups total)
1/4 cup Parmesan cheese
pizza sauce (the recipe does not call for this. I added this to make the pasta more like pizza. I used probably 1 cup of sauce. Just enough to coat all the ingredients, but not to make it too soupy)

*Combine all ingredients, except for the Parmesan cheese, in a crock pot or slow cooker. Mix thoroughly. Cover; cook on low 4-6 hours (or high 2-3 hours). Top with the Parmesan cheese. Cover and cook on high for another 15 minutes.

And what better to eat with Pizza Pasta then pizza dough flavored breadsticks! I know, too many carbs. I don't care. I just doctored some store bought breadsticks. I brushed them with olive oil and sprinkled them with Italian seasoning. Yummy!

Sunday, March 1, 2009

Another Strange Combo

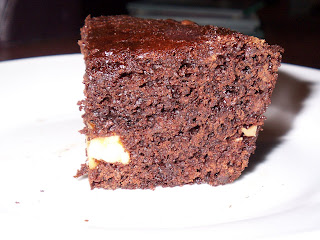
Heaven Sent Brownies. That is what these are titled. Curious name, even more curious ingredients. Do you remember my post from last weekend where I was foraging for ingredients? Well, these brownies are a result of my foraging. I had one egg, no brown sugar and not very much oil.

So, the result was searching on www.allrecipes.com for a brownie recipe. Seriously, brownies are my go-to dessert. I never get tired of them. Never. And I like to try new ones often.

These weren't bad. The husband turned his nose up at them based on the sweetener. He's not a honey fan. Yes folks, I said honey. The honey was definitely noticeable in this recipe. If you don't like honey, I don't suggest making these. Or, if you do, don't use a strong honey like I did. I used an organic honey and it was very noticeable. But not in a bad way, I promise! The combination of honey and chocolate was very good.

I followed the recipe exactly, except I added walnuts. Okay, so I guess that isn't exactly. I had some walnuts on hand from a recipe long ago, so rather than let them go to waste, I added them to the batter.

I love thick brownies, and these guys were sure thick! If you use the 8x8 pan, you will get big brownies. Of course, you can always use a different pan. There is no rule. Just remember to change the baking time if you use a larger pan.

The husband took one bite and said "These are all your's. Yuck". Guess what? More for me! Hahahahaha! Wait, it's not nice to laugh. Especially when I will probably gain 5 pounds for eating the whole pan.

Heaven Sent Brownies
from: www.allrecipes.com (submitted by Ryan)

1 1/3 cup flour
1/2 cup unsweetened cocoa powder
1 cup white sugar
1.5 teaspoons baking soda
1/4 cup vegetable oil (I used canola oil)
1/2 cup water
1/3 cup honey, warmed slightly
1 teaspoon vanilla extract
1.5 teaspoons distilled white vinegar
1/2 cup semisweet chocolate chips

1. Preheat oven to 350 degrees. Grease and flour an 8x8 inch pan.

2. In a medium bowl, stir together the flour, cocoa, sugar and baking soda. Make a well in the center and pour in the oil, water, honey, vanilla and vinegar; mix well. Fold in chocolate chips. Spread evenly in the prepared pan.

3. Bake for 25 to 30 minutes in the preheated oven, untl brownies spring back when lightly touched. Let cool in the pan for at least 10 minutes before cutting into squares.

In honor of my love for the end piece of the brownie. Here's a picture.

Oatmeal, Raisin and.......Chocolate?

I know, strange combination. And I also know that I have said that before on my blog several times. Ie; shrimp and grits, mayonnaise and chicken, and bacon and pasta. So, that being said, I thought oatmeal, raisin and chocolate was an odd pairing (or is it thirding since that is three ingredients?).

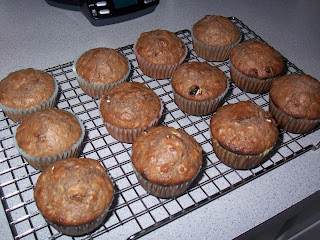
I wanted something sweet today, and something to take along to my in-law's since we are heading over there for dinner. I am too lazy to make cookies, so I thought, "Hmm, I wonder if there is a recipe for oatmeal raisin muffins on the internet somewhere?" Well, I found one. Thank you trusty allrecipes.com! This recipe had all the yumminess of oatmeal raisin cookies but in a muffin form. Also, it had a couple of tablespoons of cocoa, which I thought was unique.

I was under a bit of pressure, because I haven't done the grocery shopping for the week (bad Pachey), and I was limited with ingredients. I had one egg on hand, not very much milk, no brown sugar and was running low on oil. That severely limited the choices that I had. It must have been divine intervention because this recipe only took one egg! And only a cup of milk!! And only 1/4 of oil!!! Can you tell I am excited? Even better, it doesn't have a lot of sugar, which makes it diet-friendly.


Between rinsing out towels and cleaning soap suds out of my washer (that's a story for another time), these muffins were baking. The house smelled like a combination of brownies and oatmeal raisin cookies. When they came out of the oven, they were dark, but not dark enough to tell that they contained cocoa powder.


Mmmmm, they are good! Very easy to put together, and I would classify them as a muffin for any time of day. They have oatmeal and raisin in them, so they are appropriate for breakfast. Plus, with the addition of the chocolate, they are good for an after dinner treat too! That is why I labeled this one as Dessert and Breakfast


I hope my in-laws like them. They are traditionalists and frown upon anything new. Well, I might just have to break them of that trait.


Chocolate Raisin Oatmeal Muffins
from: http://www.allrecipes.com/ (submitted by CHEWLY)


1.5 cups flour
1 tablespoon baking powder
2 tablespoons unsweetened cocoa powder
1 cup rolled oats
1/2 cup white sugar
1/4 teaspoon salt
1 cup raisins
1 cup milk
1 egg
1/4 vegetable or canola oil


1. Preheat oven to 400 degrees. Grease a muffin pan or line with paper muffin liners. Stir together flour, baking powder and cocoa powder. Set aside.


2. In a large bowl, stir together the rolled oats, sugar and salt. Mix in the other dry ingredients and raisins. Add the milk, egg, and oil. Mix until just blended. The batter will be lumpy. Spoon batter into the prepared muffin cups.


3. Bake for 15 to 20 minutes or until a toothpick inserted in the center comes out clean. Remove from cups to cool on a wire rack.